
Introduction
Standard FRP bypass methods no longer work on many newer smartphones, notably those running Android 14 or later. Locked bootloaders, patched exploits, and unsupported models might disable Safe Mode gimmicks and browser quirks.
Advanced FRP bypass is needed in such instances. These procedures require more technical expertise and caution. Use these methods on legal devices. This article will cover different methods to bypass FRP lock and recommend a great Android phone unlocker tool in case you get locked out.
Prerequisites for Advanced FRP Bypass
Preparation is essential before advanced FRP Bypass Android techniques. The technique requires a PC with administrator access, OEM USB drivers for your device, and high-quality USB cables to ensure stable connections. If data recovery is possible, install trustworthy backup tools. Hardware-based approaches require screwdrivers, an EMMC programmer, and a hot air rework station for chip removal and reprogramming.
Your technical skill level is equally significant. These methods involve basic ADB, Fastboot, firmware flashing, and hardware repair abilities. Suppose you’ve never used command-line tools or device internals, practiced on test devices, or asked a professional. A minor mistake in these steps could permanently harm or erase your phone.
Software-Based Advanced Techniques
Newer Android versions or unsupported devices may not support typical FRP bypass methods. However, specialized software can help. Two methods are below:
Method 1: Using Dr. Fone’s Advanced Mode
This solution works when Dr.Fone workflows fail on newer Android versions.
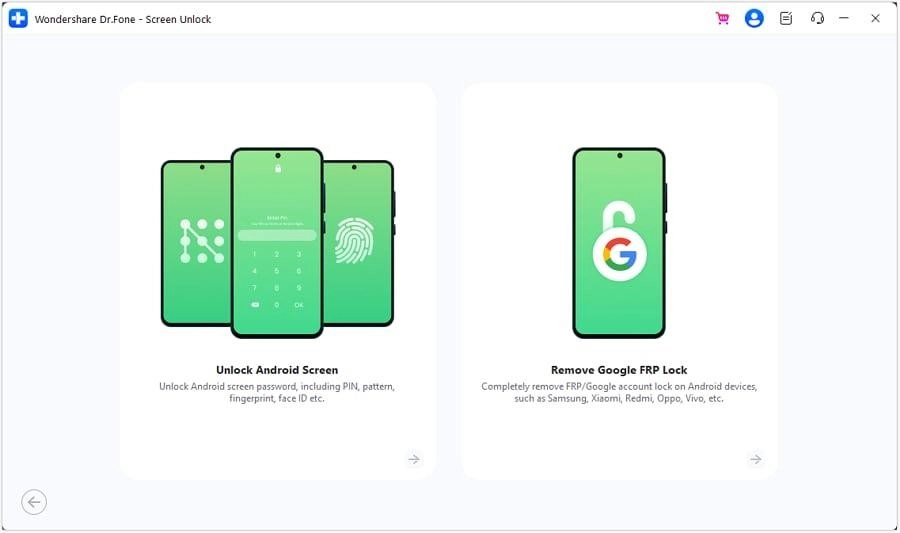
Step 1. Launch Dr.Fone on your PC. Find the “Screen Unlock” tab. Choose “Remove Google FRP Lock.”
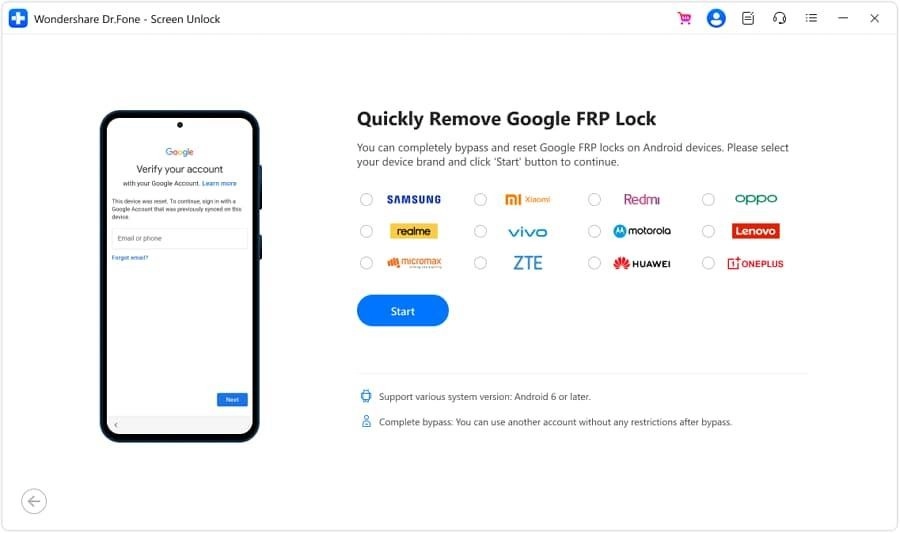
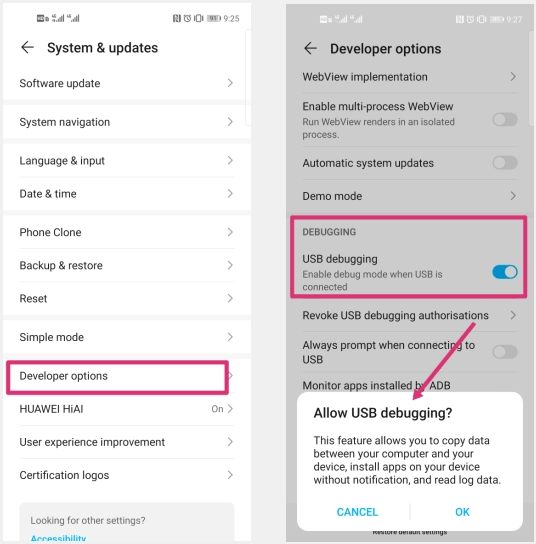
Step 2. Connect Android to PC via USB. Enable USB debugging. Choose the android brand and the software will download the drivers.
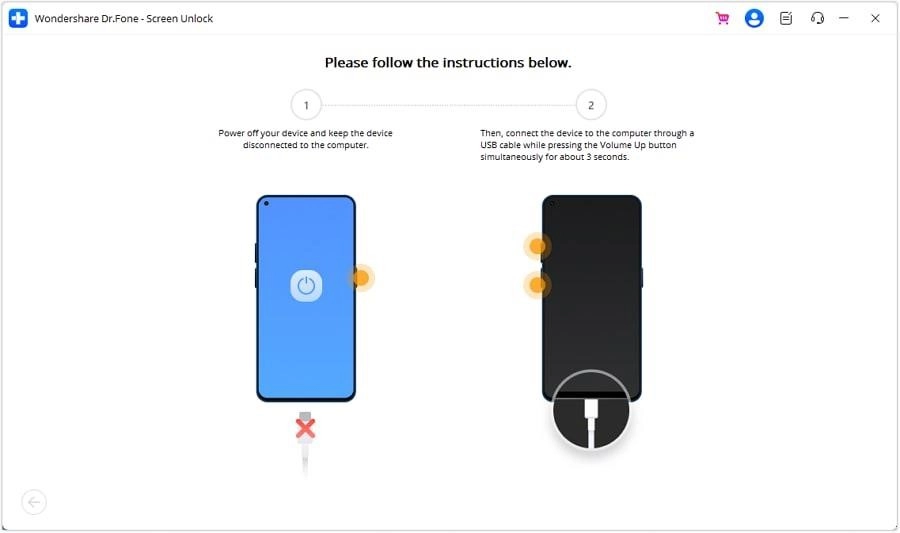
Step 3. Enter “Download Mode” using the on-screen instructions. Dr.Fone downloads your device’s firmware automatically. Downloaded program flashes firmware to bypass FRP lock.
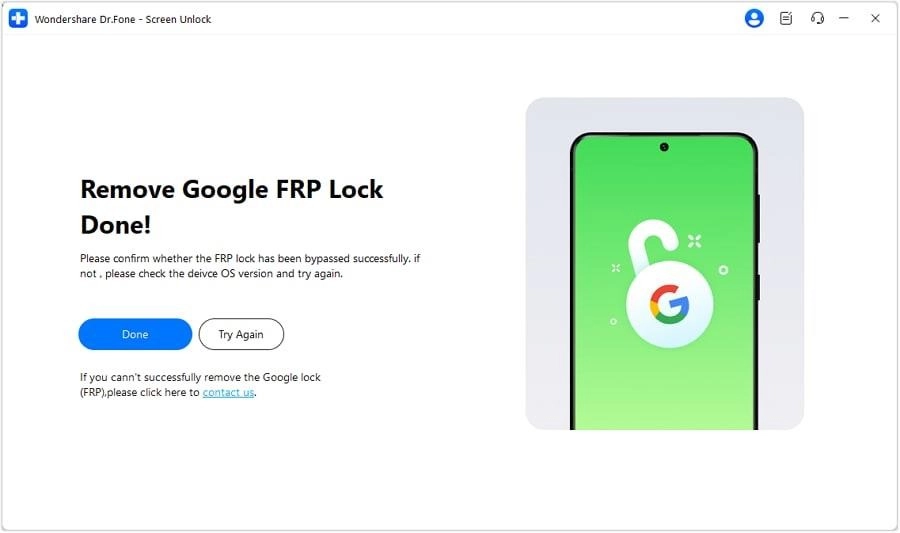
Step 4. Restart your device after finishing. Device setup should now be possible without Google verification.
Method 2: Manual ADB/Fastboot Commands
Debugging modes are used to disable FRP via command-line tools.
Step 1. Visit the Android Developers website to get “SDK Platform-Tools.” Extract the files to a PC folder.
Step 2. Follow the prompts to install drivers with “adb.exe.”
Step 3. Tap “Build number” seven times in “Settings” > “About phone” on your Android device to enable Developer Options. On “Developer Options,” set “USB debugging.”
Step 4. Connect your gadget to the PC via USB.
Step 5. Open the Platform-Tools’ extracted folder. Hold Shift, right-click the folder, and choose “Open command window here.”
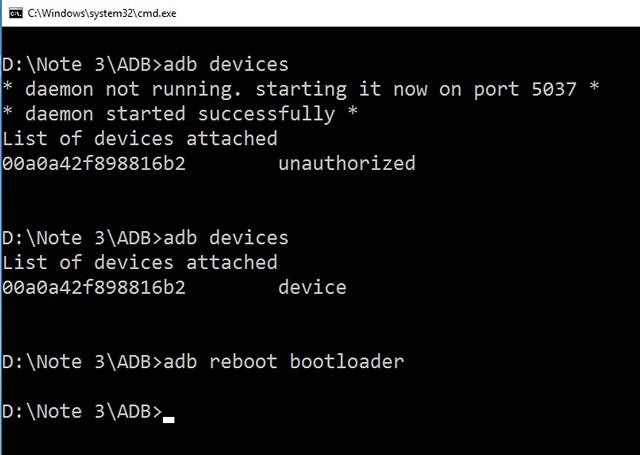
Step 6. Enter the following commands on the command prompt, one after another:
adb shell am start -n com.google.android.gsf.login/.
adb shell am start -n com.google.android.gsf.login.LoginActivity.
adb shell content insert –uri content://seĖngs/secure –bind name:s:user_setup_complete –bind value:s:1.
For Samsung devices, use:
adb shell content insert –uri content://seĖngs/secure –bind name:s:user_setup_complete –bind value:s:1.
Hardware-Based Advanced Techniques
Advanced hardware-based FRP bypass methods can replace conventional methods when they fail. Experienced technicians use these approaches to engage with the device’s hardware directly.
Method 1: EMMC Chip Removal and Reprogramming
Physically removing the device’s EMMC chip lets you access and edit its data. Technicians can erase the chip’s FRP lock information.
Tools required:
- Reworkinghot
- AUFI Box or EasyJTAG EMMC
- Soldering
- Microscope(for precision).
Step 1. Disassemble the device to reach the motherboard.
Step 2. Desolder the EMMC chip carefully using the hot air rework station.
Step 3. Insert the chip into the EMMC programmer.
Step 4. Find and delete FRP or permanent partitions using programming software.
Step 5. Solder the motherboard’s EMMC chip again.
Step 6. Reassemble and power the gadget.
Method 2: JTAG/Box Solutions
JTAG devices like RIFF Box and EasyJTAG access low-level system functionality directly from the device’s test points. System partition modifications let technicians bypass the FRP lock.
Compatibility: Samsung, Huawei, and MediaTek smartphones.
Step 1. Disassemble the gadget to find the motherboard JTAG points.
Step 2. Use cables to connect the JTAG box to the device. Launch the JTAG software (e.g., UFI Tool Box, Medusa Pro) on your PC.
Step 3. Choose FRP bypass in the software. Complete the process using on-screen directions.
Hybrid Methods: Combining Dr.Fone with Manual Techniques
A hybrid solution using Dr.Fone and manual ADB interventions can work in difficult FRP settings, especially on newer Android versions or devices with addressed vulnerabilities. This solution uses Dr.Fone’s user- friendly interface to overcome FRP locks and ADB commands to remove them.
Example Workflow
1. Initiate Partial Bypass with Dr.Fone:
Step 1. Launch Dr.Fone and select “Screen Unlock.”
Step 2. Click “Remove Google FRP Lock” and follow the on-screen steps to bypass.
Step 3. Dr.Fone will try to remove the FRP lock, but some devices may fail.
2. Finalize Bypass Using ADB Commands:
Step 1. Allow USB debugging on your device.
Step 2. Connect your gadget to the PC with a USB.
Step 3. Open the computer’s Command Prompt or Terminal.
Step 4. Find ADB’s installation directory.
Step 5. Run these commands:
adb shell content insert –uri content://seĖngs/secure –bind name:s:user_setup_complete –bind value:s:1
adb reboot
The FRP lock is removed when these commands complete device setup.
When to Use
This hybrid method works well when Dr.Fone’s normal procedure doesn’t remove the FRP lock and the device supports ADB. Users who prefer command-line operations and manual FRP bypass will find it useful.
Risks:
- Complexity:Combining software tools with manual commands makes the procedure more
- Errors:Incorrect ADB commands might cause data loss or device
- LimitedSupport: ADB access is limited on some devices, especially those with FRP locks and disabled USB debugging.
Risks and Limitations of Advanced Techniques
Advanced FRP bypass strategies can help when regular approaches fail, but they have risks and restrictions that users must consider.
- Devicebricking is a major Poor flashing or chip removal can corrupt the firmware, rendering the device inoperable. This condition is generally unrecoverable without specific equipment or technical competence.
- Dataloss is another When unlocking the bootloader or altering partitions during chip-level procedures, all data is lost and cannot be restored without backups.
- Legal consequences may result, especially in places where bypassing security features breaches DMCA or other anti-circumvention legislation. Use only legally owned gadgets.
- Warranty voidance is a real thing. Opened devices or modified hardware and software usually violate manufacturer warranties, preventing further assistance.
Conclusion
Powerful and advanced FRP bypass techniques should be used cautiously. They’re for when normal methods fail, often with newer Android or locked devices. Using Dr.Fone’s advanced features, ADB/Fastboot commands, or hardware-level interventions like EMMC or JTAG requires technical skill and understanding of risks. Always use a legally owned device and consider data loss, bricking, and legal difficulties. These tools can help you unlock your iPhone if used carefully, but they have risks.